Migrating your WooCommerce store to a new WooCommerce hosting provider can seem daunting for obvious reasons. Downtime, data loss, and configuration errors are common concerns. But with the right approach, you can ensure a smooth transition without affecting your store’s performance or sales.
In this guide, we’ll walk you through the step-by-step process to move your WooCommerce store seamlessly, using a reliable method that ensures zero downtime and minimal effort.
Why Move Your WooCommerce Store?
Before diving into the migration process, let’s briefly discuss why you might want to move your WooCommerce store to a new hosting provider:
- Better Performance: Faster servers and optimized infrastructure can improve page load speed and enhance user experience.
- Scalability: Your store may be growing, and you need a hosting provider that can handle increased traffic and sales.
- Better Security: Improved security features and compliance with industry standards.
- More Affordable Pricing: A cost-effective hosting plan with better features.
- Improved Support: A more responsive and WooCommerce-friendly hosting provider.
If any of these reasons apply to you, it’s time to move your WooCommerce store to a better hosting environment.
Step 1: Set Up Your New Hosting Environment
Before migrating your store, ensure that your new hosting environment is ready. What you Need on the new hosting is:
- A blank WordPress installation.
- PHP and MySQL versions compatible with WooCommerce.
- SSL certificate for secure transactions.
- Sufficient storage and bandwidth for your store’s size.
If your hosting provider does not offer a one-click WordPress installation, you can manually install WordPress via cPanel or a custom hosting dashboard.
Note: If you’re looking for a WooCommerce-optimized hosting solution, InstaWP Live is a great choice. It offers a fast, secure, and fully managed environment, perfect for handling high-traffic eCommerce stores.
Step 2: Use InstaWP’s WordPress Migration Tool
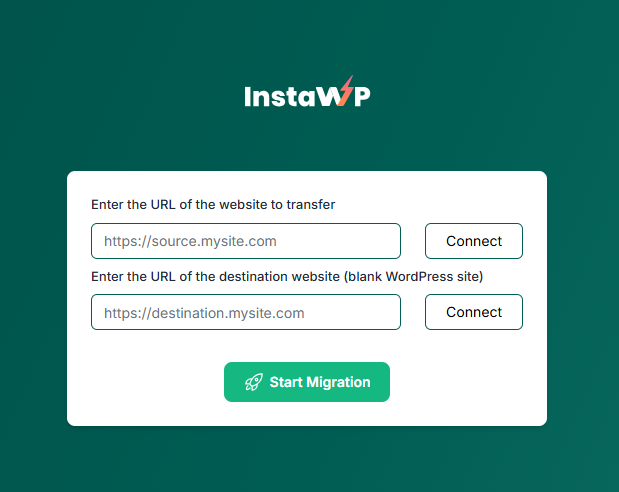
Instead of manually moving files and databases, the easiest way to migrate your WooCommerce store is by using the InstaWP WordPress Migration Tool. This tool automates the process, ensuring a seamless transition with minimal effort.
How to Use InstaWP’s Migration Tool:
- Initiate Migration: On your new hosting, install a fresh WordPress instance.
- Connect Source and Destination: Provide the URL of your existing WooCommerce store (source) and the new site (destination).
- Authorize InstaWP Connect: You’ll be prompted to authorize InstaWP Connect on both the source and destination sites.
- Start the Migration: Once both sites are connected, click on Start Migration. The tool will handle database transfer, product listings, images, themes, and settings automatically.
- Monitor Migration Logs: The migration log helps you track the process and identify any potential issues.
Once the migration is complete, your WooCommerce store will be fully operational on the new hosting provider.
Step 3: Test Your WooCommerce Store on the New Hosting
After migration, it’s crucial to test your store to ensure everything is functioning correctly. Here’s what you need to check:
- Homepage and Product Pages: Ensure all products, images, and descriptions are visible.
- Checkout Process: Complete a test purchase to verify that payments are working.
- User Accounts: Ensure customer login and order history are intact.
- Plugins and Themes: Verify that all plugins and themes are activated and configured correctly.
- Site Speed: Test page load times to ensure the new hosting is performing well.
If any issues arise, check the migration logs for errors or re-run the migration if necessary.
Step 4: Update Domain and DNS Settings
If your WooCommerce store uses a custom domain, you’ll need to update your DNS settings to point to the new hosting provider. Follow these steps:
- Log into your domain registrar account.
- Find the DNS settings for your domain.
- Update the A record and CNAME record to point to your new hosting server’s IP address.
- Save changes and allow time for propagation (this can take anywhere from a few minutes to 48 hours).
During this time, avoid making changes to your WooCommerce store to prevent data inconsistency.
Step 5: Final Optimization and Backup
Once your WooCommerce store is live on the new hosting, take some final optimization steps:
- Enable Caching: Improve site speed with caching solutions.
- Optimize Images: Compress images for faster load times.
- Set Up Backups: Regular backups are essential to prevent data loss.
- Monitor Performance: Use tools like Google PageSpeed Insights to check performance metrics.
Conclusion
Migrating your WooCommerce store to a new hosting provider doesn’t have to be complicated. By following this step-by-step guide and using InstaWP’s WordPress Migration Tool, you can move your store effortlessly with minimal downtime and no data loss.If you’re also looking for a fast, secure, and scalable hosting solution for WooCommerce, consider InstaWP Live—an optimized environment built for eCommerce success. Happy migrating!